Creating a Card Linking Program with the Fidel APIs

We’ve come a long way in the world of payments. The process has become faster and faster, to the point where we’re now talking about service delivery in real-time, occurring almost instantaneously after the users’ action.
It’s a remarkable leap, but the phrase ‘real-time’ has also begun to become something of a buzzword, lost in its overuse and over-simplification. What does it really mean? How does a ‘real-time’ process work?
Take the Fidel transaction API as an example. Incredibly useful, easy to integrate - a powerful, real-time transaction-tracking tool.
In a nutshell, it means that every card enrolled on a program has every transaction (at specific locations) logged in real time. From that, the program owner gains better understanding and context as to how customers shop with their brand - both online and in-person.
A transaction API ties the customers’ credit card to their account, eliminating the need for “bonus cards,” random QR codes, barcodes or loose coupons. It just happens automatically whenever a transaction is made.
As the API is improved and developed, the uses and possibilities are, essentially, endless.
Loyalty card transaction APIs are closely related, where cards that are enrolled in the loyalty card scheme have all transactions immediately entered into the scheme. Our documentation walks you through how to build a loyalty card scheme with the UI in our developer dashboard. However, 95% of creating a loyalty program can be done directly with the Fidel APIs right in your app (or from the terminal).
In this post, we’ll walk through the steps to take to create a loyalty card scheme using just Fidel API calls. For simplicity, we’ll use cURL to make all of the API calls. Or, you could use any other HTTP client to do the same. We may, or may not, also explain a lot of this with Star Wars references. Just’ cos.
Loyalty Program Basics

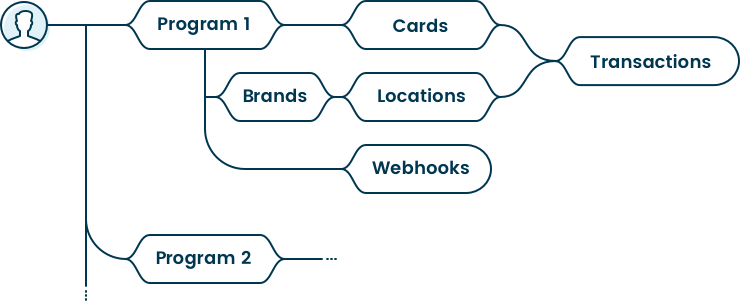
Each loyalty program contains cards, which act as a proxy for your users. They also contain brands that have specific locations (think of your favourite coffee chain, and every place you can go to pick up a latte). When a transaction occurs - it is affiliated with the card and location. Both of which feed back into the program.
When building a loyalty program, we run the process in reverse - creating a program before adding a brand and locations. Then customers can begin adding cards, and Fidel will record the transactions. Webhooks can be used to monitor the process.
Starting out: Creating an Account and Copying Your API Key
It’s super easy to get started using the Fidel API. You just need to sign up for a free account and grab your API key. (This is technically a visit to the dashboard, but we’re not building anything yet!) To get your key, use the user menu at the top right to find your account page. Free accounts have full access to the Fidel APIs in our test environment, so you’ll want your Secret Test Key to run the API commands in this post.
Creating a Program
Ok - now you’ve got your account and API key - let’s make our first API call - to create a program.
For ease of use, we’ll use cURL to make our API calls. If you have any questions about the APIs, just take a look at the API Reference.
Creating a program involves a POST connection to Fidel with our API Key and the name of the program you’d like to create.
In this case, I’m going to name my Program “Star Wars Quotes.”
curl -X POST https://api.fidel.uk/v1/programs -H 'content-type: application/json' -H 'fidel-key: sk_test_f0005329-6324-49e5-86c6-429030a9a493' -d '{"name": "Star Wars Quotes"}'
There are 2 headers added, one indicating JSON, and the other with my test API Key. The body of the post is the simple JSON with my program name. We immediately get a response:
{
  "items": [
    {
      "accountId": "fec57ce7-d161-4c8f-8da0-1ebf841f4739",
      "live": false,
      "name": "Star Wars Quotes",
      "syncStats": {
        "status": "completed"
      },
      "updated": "2020-06-04T12:05:38.169Z",
      "created": "2020-06-04T12:05:38.169Z",
      "id": "b4b6d68f-a05a-4cc5-8b9f-f6e82cd988d0",
      "active": true,
      "activeDate": "2020-06-04T12:05:38.169Z",
      "sync": false
    }
  ],
  "resource": "/v1/programs",
  "status": 201,
  "execution": 18.983461
}
Important values here: the accountId is your user account id at Fidel. The id is the programId - which we will use to reference this program in future API calls.
https://media.giphy.com/media/3ornjPaUwr60cYjXuE/giphy.gif
Creating our Brand
Brands are independent of Programs and can be reused between different programs.
For this post, we’ll create a brand called “I’ve got a bad feeling about this”. Since this line is used in every Star Wars Movie - this is clearly a strong brand for my “Star Wars Quote” program. But it could be used in an Indiana Jones Program, Big Bang Theory, or any other show where this line has been used.
Again - all I need is the name of my Brand, my API key, and if I want - a link to the Brand Logo. Note that there is not currently a way to add an icon after this step, so this is your only chance! As you might expect, the endpoint is /brands:
curl -X POST  https://api.fidel.uk/v1/brands  -H 'content-type: application/json'   -H 'fidel-key: sk_test_f0005329-6324-49e5-86c6-429030a9a493'  -d '{
    "name": "I’ve got a Bad Feeling about this",
    "logoURL": "https://m.media-amazon.com/images/M/MV5BYzA0MmMxZjQtYzcwZC00MGM3LThkNjEtYTAyNTBlZjI1NWUzXkEyXkFqcGdeQXVyMzI5ODg0OTE@._V1_SY1000_SX1000_AL_.jpg"  }'
Submitting this - success! We have created the brand! Great, kid! Don’t get cocky.
{
  "items": [
    {
      "accountId": "fec57ce7-d161-4c8f-8da0-1ebf841f4739",
      "consent": true,
      "live": false,
      "logoURL": "https://m.media-amazon.com/images/M/MV5BYzA0MmMxZjQtYzcwZC00MGM3LThkNjEtYTAyNTBlZjI1NWUzXkEyXkFqcGdeQXVyMzI5ODg0OTE@._V1_SY1000_SX1000_AL_.jpg",
      "name": "I’ve got a Bad Feeling about this",
      "updated": "2020-06-04T12:22:21.945Z",
      "created": "2020-06-04T12:22:21.945Z",
      "id": "4aef8401-7014-4ac5-88d7-664a179c40f3"
    }
  ],
  "resource": "/v1/brands",
  "status": 201,
  "execution": 29.559367
}
Locations
Each program will be redeemable at various locations where the Program is operating under the specified brand. In this case, we’ll add a few locations (using just the locations from Episodes 4-6 where someone said “I’ve got a bad feeling about this”:
Luke Skywalker: Death Star, USE FRC
Han Solo: Death Star Trash Compactor, TRA SH
Leia Organa; Asteroid Monster MYN OCK
C3PO: Jabba’s Palace TAT OIN
Han Solo Ewok Village END OR
If you look carefully, the endpoint uses the ProgramId in the URL string, and the BrandId is presented as a parameter in the JSON:
 curl -X POST   https://api.fidel.uk/v1/programs/b4b6d68f-a05a-4cc5-8b9f-f6e82cd988d0/locations   -H 'content-type: application/json'   -H 'fidel-key: sk_test_f0005329-6324-49e5-86c6-429030a9a493'   -d '{
    "address": "Luke Skywalker",
    "brandId": "4aef8401-7014-4ac5-88d7-664a179c40f3",
    "city": "Death Star",
    "countryCode": "GBR",
    "postcode": "USE FRC"}'
NOTE: If you are adding locations in production and have a MerchantID (MID) for these locations from the card schemes, adding the MID here can speed up the confirmation of your locations. In the test environment, your locations are automatically verified and approved. In the live environment, these need to be verified by the card schemes, using the Location Sync process. And yes, this is, for now, a manual process that must be done in the Fidel dashboard.
Since we are in test, I did not add a merchantID, but the location was added successfully:
{
  "items": [
    {
      "accountId": "fec57ce7-d161-4c8f-8da0-1ebf841f4739",
      "address": "Luke Skywalker",
      "brandId": "4aef8401-7014-4ac5-88d7-664a179c40f3",
      "city": "Death Star",
      "countryCode": "GBR",
      "currency": "GBP",
      "live": false,
      "postcode": "USEFRC",
      "programId": "b4b6d68f-a05a-4cc5-8b9f-f6e82cd988d0",
      "geolocation": {
        "latitude": 51.5138332,
        "longitude": -0.1318224
      },
      "preonboard": false,
      "timezone": "Europe/London",
      "updated": "2020-06-04T12:35:23.518Z",
      "created": "2020-06-04T12:35:23.518Z",
      "id": "96eee5fc-704a-4854-9715-e42efce0c379",
      "amex": {
        "clearing": false,
        "auth": false,
        "authTransactionId": null,
        "clearingTransactionId": null,
        "status": "active"
      },
      "mastercard": {
        "clearing": false,
        "auth": false,
        "authTransactionId": null,
        "clearingTransactionId": null,
        "status": "active"
      },
      "visa": {
        "clearing": false,
        "auth": false,
        "authTransactionId": null,
        "clearingTransactionId": null,
        "status": "active"
      },
      "activeDate": "2020-06-04T12:35:23.518Z",
      "active": true
    }
  ],
  "resource": "/v1/programs/b4b6d68f-a05a-4cc5-8b9f-f6e82cd988d0/locations",
  "status": 201,
  "execution": 101.214404
}
For the sake of this post length, trust that I did the same with the other four locations. We have now created our Fidel Card loyalty program using (mostly) just the API.

Adding Cards
For customers to enrol in the card-linked loyalty program, they must register their cards. Fidel has a PCI compliant Web SDK (and mobile SDKs) that collect the card information from your customers. Which means you never have to worry about properly handling the card numbers - you never see the cards! For an example of our Web SDK, you can see a working example in our previous post on using Webhooks.
For simplicity in this post, we will just use the add Card API. We can use test card numbers to register cards into our Program.
NOTE: The add card API is used in the WebSDK (and visible in the website source), you must use your public key for this API call.
curl -X POST https://api.fidel.uk/v1/programs/b4b6d68f-a05a-4cc5-8b9f-f6e82cd988d0/cards -H 'content-type: application/json' -H 'Fidel-Key: pk_test_0367fe38-cdc7-41a2-9d4c-74a1854c171e' -d '{"number": "4444000000004222", "expMonth": 10, "expYear": 2021, "countryCode": "GBR","termsOfUse": true}'
And we see that the card is successfully added:
{
  "items": [
    {
      "accountId": "fec57ce7-d161-4c8f-8da0-1ebf841f4739",
      "countryCode": "GBR",
      "expDate": "2021-10-31T23:59:59.999Z",
      "expMonth": 10,
      "expYear": 2021,
      "firstNumbers": "444400",
      "lastNumbers": "4222",
      "live": false,
      "programId": "b4b6d68f-a05a-4cc5-8b9f-f6e82cd988d0",
      "scheme": "visa",
      "type": "visa",
      "updated": "2020-06-04T13:05:05.420Z",
      "created": "2020-06-04T13:05:05.420Z",
      "id": "6e03470d-a441-45a4-851e-883b51f28b26"
    }
  ],
  "resource": "/v1/programs/b4b6d68f-a05a-4cc5-8b9f-f6e82cd988d0/cards",
  "status": 201,
  "execution": 35.621642
}
Transactions
For testing purposes, there is a Transactions API, where a cardId and an amount can be sent to a specific program. I’ll leave that here as an exercise for you. Feel free to use my locationId from above. I have a very good feeling about this one - you should see your transaction posting successfully in no time.
Conclusion
Creating a card linking program is very easy to do, using the Fidel Dashboard, or using our API. In this post, we’ve walked through all the steps to create a card linking program with our APIs. After testing with our API, we know you’ll be itching to get into production and create your own card linking program.

If you have any questions, please feel free to reach out to our community at https://community.fidel.uk.


